Maven Project Structure
Creating Maven Project
We
will create maven project using two ways:
1) Using command line in CMD (command
prompt) in windows
2) Using eclipse maven plug-in in eclipse
1) Creating
a Maven project using command line
We need following command
mvn
Using mvn command along with other
attributes
mvn archetype:generate -DgroupId={ project-packaging } -DartifactId={ project-name }
-DarchetypeArtifactId=maven-archetype-webapp -DinteractiveMode=false
We will create our maven project using our
own values for attributes DgroupId , DartifactId , DarchetypeArtifactId
mvn archetype:generate
-DgroupId=mavenproject -DartifactId=myproject
-DarchetypeArtifactId=maven-archetype-webapp -DinteractiveMode=false
Press enter to execute above command
Our maven project has been successfully
created.
Depending on which IDE used for
development, import the project and start working with your project.
We will import the project created in
eclipse using following steps:
1) Go to File and click on import
2) Type maven, select Existing Maven
Projects and click Next
3) Click on browse, search for the project
on drive where generated and click ok
4) Once imported click on Finish to
complete
5) We can see the imported project.
Although its been created successfully, some folder have not been created. We
will create them in following steps
6) Right Click on the project, Go to properties,
Click on Java Build path .At right select on source tab.
7) Select entries marked with red box with
cross symbol and clicks remove one by one.
8) After removing we can see as below
9) Creating java folder under main folder
a) Click Add
Folder
b) Select main
folder
c) Click on
create new folder
d) Type java under Folder name
e) Click on
Finish
f) java folder in now created under main
folder
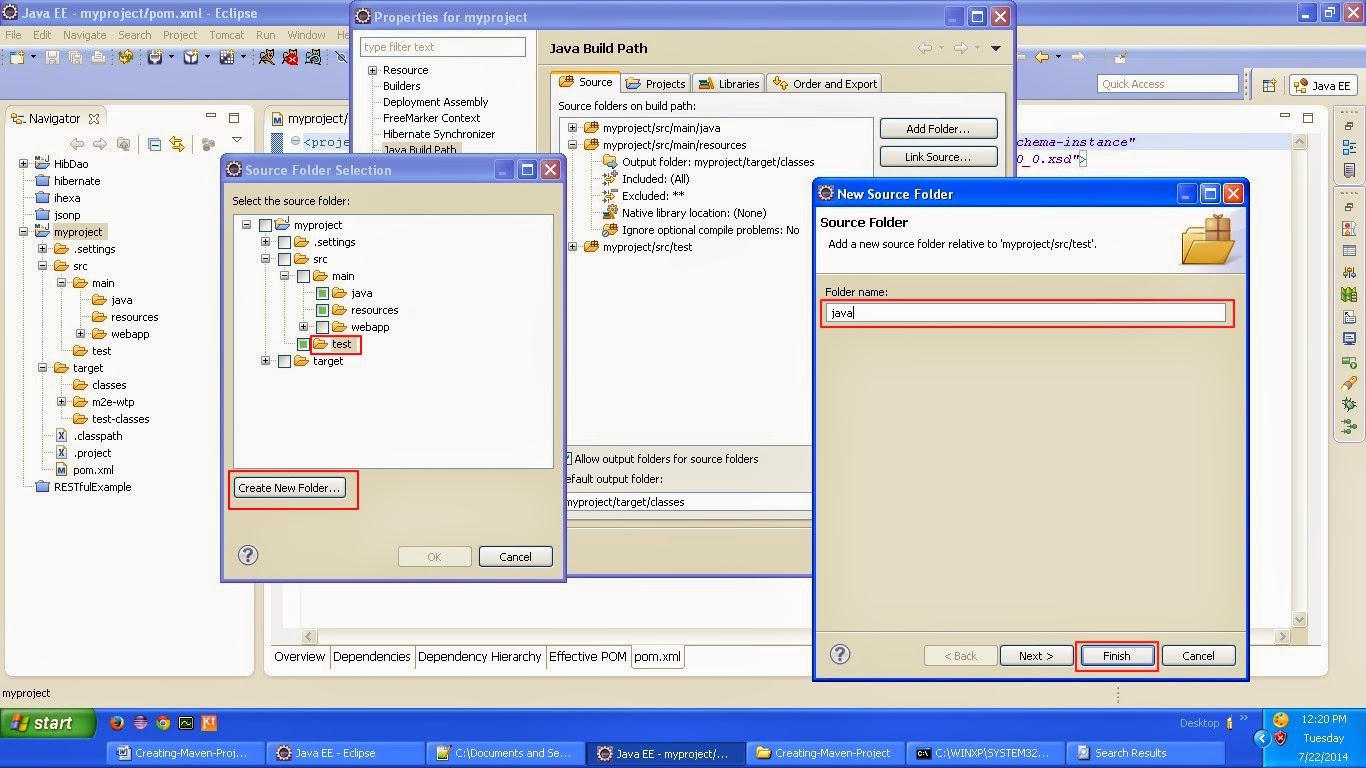
10) Create test folder under src folder
11) Create java folder under test folder
12) Now the whole maven project structure
has been created as shown below
2) Creating a Maven project using Eclipse Maven plug-in
a)
Go to File, then new, and then other...
b) Search by typing maven, select Maven
Project and Click Next
c) Click Next
d) Select Internal under Catalog, Filter
using webapp
Select
maven-archetype-webapp from artifact Id column in filtered list
e) Enter
Group Id = mavenproject
Artifact Id = myproject
Package = com.hh
Keep version as it’s, not compulsory to
change
Click on Finish
f) Maven project has been created
successfully in eclipse
g) If you check the maven structure, the
newly created project structure is not exactly like the maven structure as
shown in maven structure image.
Please create other folders required as
directed under Topic Create maven project using command line.


0 comments:
Post a Comment