Tuesday, July 22, 2014

Maven Project Structure


Creating Maven Project


We will create maven project using two ways:
1) Using command line in CMD (command prompt) in windows
2) Using eclipse maven plug-in in eclipse

1) Creating a Maven project using command line
We need following command
mvn
Using mvn command along with other attributes
mvn archetype:generate  -DgroupId={ project-packaging }  -DartifactId={ project-name }
 -DarchetypeArtifactId=maven-archetype-webapp  -DinteractiveMode=false

We will create our maven project using our own values for attributes DgroupId , DartifactId , DarchetypeArtifactId
mvn archetype:generate -DgroupId=mavenproject -DartifactId=myproject -DarchetypeArtifactId=maven-archetype-webapp -DinteractiveMode=false 

Press enter to execute above command
Our maven project has been successfully created.
Depending on which IDE used for development, import the project and start working with your project.
We will import the project created in eclipse using following steps:
1) Go to File and click on import
2) Type maven, select Existing Maven Projects and click Next
3) Click on browse, search for the project on drive where generated and click ok

4) Once imported click on Finish to complete
5) We can see the imported project. Although its been created successfully, some folder have not been created. We will create them in following steps
6) Right Click on the project, Go to properties, Click on Java Build path .At right select on source tab.

7) Select entries marked with red box with cross symbol and clicks remove one by one.

8) After removing we can see as below
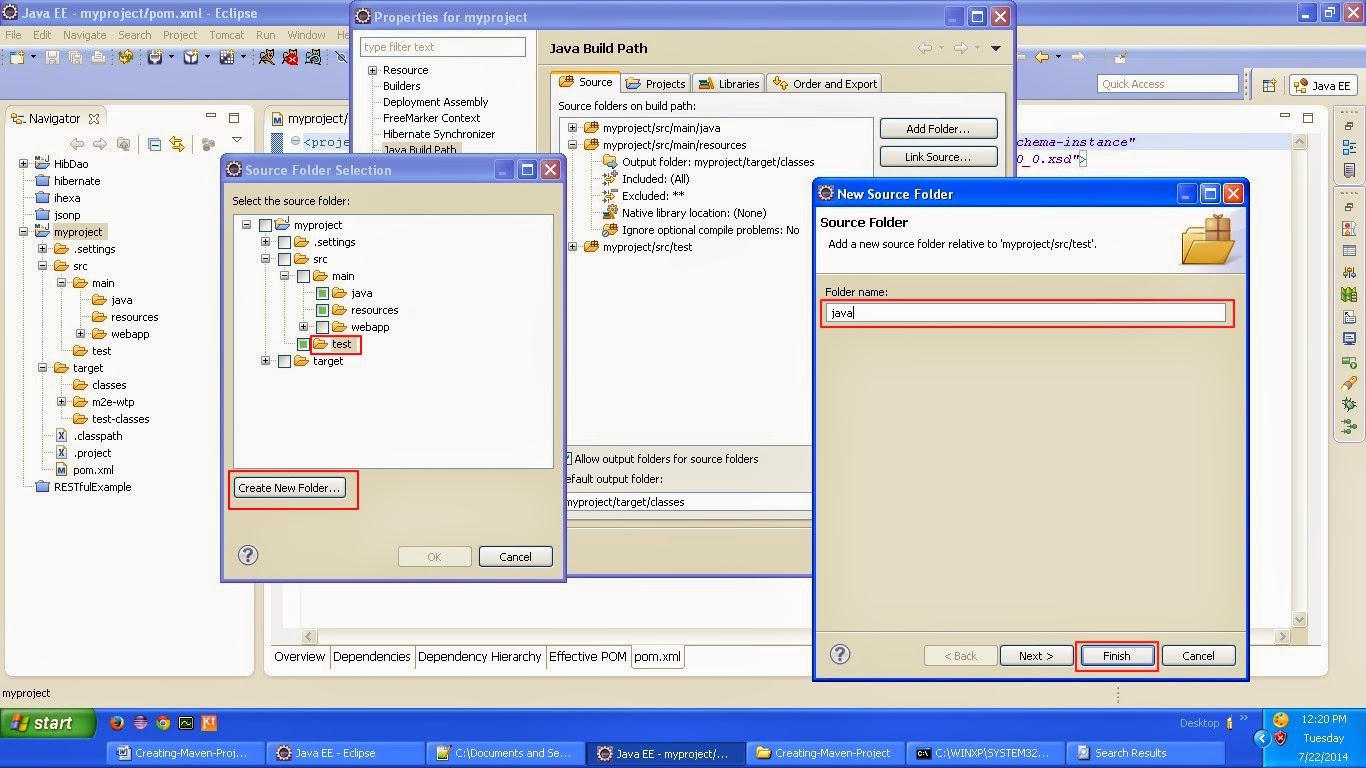
9) Creating java folder under main folder
a) Click Add Folder
b) Select main folder
c) Click on create new folder
d)  Type java under Folder name
e) Click on Finish
            f) java folder in now created under main folder
10) Create test folder under src folder
11) Create java folder under test folder
12) Now the whole maven project structure has been created as shown below

2) Creating a Maven project using Eclipse Maven plug-in


 a) Go to File, then new, and then other...
b) Search by typing maven, select Maven Project and Click Next
c) Click Next
d) Select Internal under Catalog, Filter using webapp
Select maven-archetype-webapp from artifact Id column in filtered list
e) Enter
Group Id = mavenproject
Artifact Id = myproject
Package = com.hh
Keep version as it’s, not compulsory to change
Click on Finish
f) Maven project has been created successfully in eclipse
g) If you check the maven structure, the newly created project structure is not exactly like the maven structure as shown in maven structure image.
Please create other folders required as directed under Topic Create maven project using command line.

installing maven in windows


Dowload maven any version (currently we are using 2.0.11) from web.
1) Download zip file of maven and extract to some folder on your drive as shown below

2) Setting maven in environment variable
3) Create Environment Variable MAVEN_PATH as shown
Press windows key + Pause/Break (shortcut key)

4) Add maven bin path to path environment variable
Press windows key + Pause/Break (shortcut key)
5) Check if maven is installed in windows
Open new command prompt (don’t use already opened command prompt)
Type mvn in command prompt
6) Maven installed successfully using environment variable.


Installing Maven in Eclipse

Two ways of installing maven in eclipse are
1) Using Eclipse Marketplace


2) Using Install new software

Friday, July 4, 2014

Web Services as we know are of two types

1. SOAP Web Service

 Here for examples we use WSDL as form of communication between Server and Client.
 Data trasferred between server and client as xml data.

2. REST Web Service

Here there is no WSDL Concept. 
Data transferred between server and client as json data.

Both makes us communicate when technologies of server and client differ or may be same.
Nowdays REST Web Service is being commonly used. 

It is much faster compared to SOAP in following ways.

a) Everytime we add a web method , we need to take care of wsdl which need to be send to client.
b) We tend to make mistake in generating wsdl.
c) Android developers face lot of difficulty in using SOAP Web Service.
d) With REST Web Service and its json support , makes data trasfer from android to Server easy and less time consuming.
e) Just need to create POJO classes for data transfer. 
f) Good use of Annotations , makes developing server side code easy and at a much faster pace.

Wednesday, June 11, 2014

Reading Arabic Data from MS Access Database

Reading Arabic Data from MS Access Database 


Reading and writing data to/from Ms Access Database can be done using JDBC , Hibernate etc frameworks.

Problem: I had a requirement of reading arabic data from ms access database. We tried using hibernate , jdbc .Reading other  than arabic data could be read easily done using hibernate and jdbc .
But for reading Arabic Data is difficult in JDBC and Hibernate . It mostly gives ????? for Arabic data.That means for UTF-8 it was not possible for me . So we went for JACKCESS.

We could use  JACKCESS to read Arabic data for MS Access Database. 


Jackcess is a pure Java library for reading and writing MS Access databases. It provides a robust, cross-platform backend API allowing other developers to integrate MS Access support into their Java applications


Create a  dynamic web project in java.

Download Following Jars :


Put the above jars in your lib folder.

Create a database in microsoft acces with following detail.


Say  a database Name TestDatabase and in it a

table name user .


I have three columns id , name and age .


Now to access the data i have the following code sample :

package com.MSaccessArabicData;

import java.io.File;
import java.util.Map;
import com.healthmarketscience.jackcess.Database;
import com.healthmarketscience.jackcess.Table;
public class MsDatabaseAccess {
 public static void main(String[] args) {
  try {
   Table table = Database
     .open(new File(
       "D:\\TestDatabase.mdb"))
     .getTable("user");
   for (Map row : table) {

    String name = (String) row.get("name");

    int age = (Integer) row.get("age");
    
   }

  } catch (Exception e) {
   e.printStackTrace();
  }
 }
}


Documentation for jackcess is available here.


Using Hibernate Synchronizer Tool in Eclipse

Using Hibernate Synchronizer Tool in Eclipse


This tool is used to generate hibernate mapping xml directly from database tables. This is a reverse engineering process where in we directly use database tables to generate so called hbm files. 


Installing it in eclipse 

To use this tool download hibernate synchronizer from following location:

download hibernate synchronizer


Extract the zip file to plugins folder of you eclipse .
Then restart your eclipse .

Then go to windows then to preference.


You will see the hibernate synchronizer option at the left highlighted.


Using it in project


Now go to eclipse and create a project using  File then New and then  Dynamic Web project.


Add mysql jdbc jar to the lib folder of your project.


Now right click your project src folder and create a package say com.lara


Next right click lara folder and go to new then  other and then hibernate mapping file.


suppose following is the database server


suppose following is the database configuration in mysql server .


Container : the folder in which hbm xml needs to be gernerated.

Driver      : the mysql driver class name.


URL         : the url to connect to database . Here test is my database name


Username : mysql username 


password  : mysql password


Table       : select the table to generate Hibernate mapping file .


package   : the package name in here is com.lara . This will be specified in  hbm file generated


and click Finish.


Your hibernate mapping file will be generated inside lara folder.


Generate pojo classes from the hibernate mapping file


Right click the hbm file (eg user.hbm.xml in this case) then Hibernate synchronizer and then synchronize and overwrite as shown below


The java classes will be generated as shown below:

In addition two classes will be generate , one named User in your lara folder and the setters and getters in Base User under base folder in lara package.


Now you can directly use you User class in hibernate for database access.


SOURCE CODE  download from here


Tuesday, January 7, 2014

Configuring Apache Tomcat with SSL Certificate

Refer post for Apache Tomcat Installation for installing the apache tomcat

If Apache Tomcat is already installed, Go to conf folder  and open the server.xml file

Go to section

<!-- A "Connector" represents an endpoint by which requests are received
         and responses are returned. Documentation at :
         Java HTTP Connector: /docs/config/http.html (blocking & non-blocking)
         Java AJP  Connector: /docs/config/ajp.html
         APR (HTTP/AJP) Connector: /docs/apr.html
         Define a non-SSL HTTP/1.1 Connector on port 8080
  -->   
<Connector port="8080" protocol="HTTP/1.1" 
               connectionTimeout="20000" 
               redirectPort="8443" /> 


Just comment the section as follows


<!-- A "Connector" represents an endpoint by which requests are received


         and responses are returned. Documentation at :


         Java HTTP Connector: /docs/config/http.html (blocking & non-blocking)


         Java AJP  Connector: /docs/config/ajp.html


         APR (HTTP/AJP) Connector: /docs/apr.html


         Define a non-SSL HTTP/1.1 Connector on port 8080


    <Connector port="8080" protocol="HTTP/1.1"


               connectionTimeout="20000"


               redirectPort="8443" />


  -->  

Now go to section

<!-- 
Define a SSL HTTP/1.1 Connector on port 8443
         This connector uses the JSSE configuration, when using APR, the 
         connector should be using the OpenSSL style configuration
         described in the APR 
<Connector port="8443" protocol="HTTP/1.1" SSLEnabled="true"
               maxThreads="150" scheme="https" secure="true"
               clientAuth="false" sslProtocol="TLS" /> -->


And uncomment it as follows


<!-- Define a SSL HTTP/1.1 Connector on port 8443
         This connector uses the JSSE configuration, when using APR, the 
         connector should be using the OpenSSL style configuration
         described in the APR documentation   
 -->


 <Connector port="8443" protocol="HTTP/1.1" SSLEnabled="true"
               maxThreads="150" scheme="https" secure="true"
               clientAuth="false" sslProtocol="TLS" />


Now copy the SSL certificate path and add to attributes keystoreFile and  keystorePass  in connector  tag for ssl

<Connector port="8443" protocol="HTTP/1.1" SSLEnabled="true"
               maxThreads="150" scheme="https" secure="true"
               clientAuth="false" sslProtocol="TLS"
sslProtocol="TLS" 
keystoreFile="C:\Documents and Settings\Narendra\Desktop\testcsr\client.jks"
      keystorePass="test123" />

Deploy any web application and run the apache tomcat server
Now try accesing the web application using following URL


Click o Proceed anyway to accept the certificate
When you click on Lock near https in addres bar , following window appears . Click on certificate information , Certificate window will appear. As you can see, Issued to is example.com (the client) and Issued by is sspl.com which is the Certificate Authority .


Import the CA certificate into the client keystore

Use the following command to import CA certificate


keytool –import  -keystore client.jks –file new_ca.pem –alias theCARoot
Import the CA certificate into the client keystore

Use the following command to import CA certificate

keytool –import  -keystore client.jks –file new_ca.pem –alias theCARoot


Enter keystore password : test123

Import the signed certificate for the associated client alias in the keystore.Here we have used alias as clientcls while creating the keystore client.jks
Use the following command
keytool –import –keystore clientkeystore –file client.cer –alias client

Using CA to sign our CSR

Note that the CSR file generated in previous tutorial has arrived to CA. Now the CA will sign the CSR file.

Here is the content of CSR file named as ClientCertificate_csr.pem


-----BEGIN NEW CERTIFICATE REQUEST-----
MIICXzCCAh0CAQAwWjELMAkGA1UEBhMCSU4xFDASBgNVBAgTC01haGFyYXNodHJhMQ0wCwYDVQQK
EwRTU1BMMRAwDgYDVQQLEwdTU1BMIE9VMRQwEgYDVQQDEwtleGFtcGxlLmNvbTCCAbgwggEsBgcq
hkjOOAQBMIIBHwKBgQD9f1OBHXUSKVLfSpwu7OTn9hG3UjzvRADDHj+AtlEmaUVdQCJR+1k9jVj6
v8X1ujD2y5tVbNeBO4AdNG/yZmC3a5lQpaSfn+gEexAiwk+7qdf+t8Yb+DtX58aophUPBPuD9tPF
HsMCNVQTWhaRMvZ1864rYdcq7/IiAxmd0UgBxwIVAJdgUI8VIwvMspK5gqLrhAvwWBz1AoGBAPfh
oIXWmz3ey7yrXDa4V7l5lK+7+jrqgvlXTAs9B4JnUVlXjrrUWU/mcQcQgYC0SRZxI+hMKBYTt88J
MozIpuE8FnqLVHyNKOCjrh4rs6Z1kW6jfwv6ITVi8ftiegEkO8yk8b6oUZCJqIPf4VrlnwaSi2Ze
gHtVJWQBTDv+z0kqA4GFAAKBgQC7lgoimVAL4UcigXU0moV+F21y5hFy1IxpbFXneOVBTNtTVEBK
/HHnXqqOZY/zt4pZAzxREznd6N8OQ/jMiQloCqdBbkBJB/wFBBQWu2LNje1w9xeBCXxTHZCDHPIS
MmSvXBle8Ea8Dx4XHc/YElj2Mh+nJJrjbD3z7LD75Rky3KAAMAsGByqGSM44BAMFAAMvADAsAhRB
e3g6WqpdjFl7n9W92kXDEUe4IgIUWDagaMduPq+qx2/jsfjfFdrgxXU=
-----END NEW CERTIFICATE REQUEST-----

Generate a signed certificate for the associated Certificate Signing Request.

CA uses the following command to sign the CSR file

openssl ca   -config openssl.cnf -in certs/ClientCertificate_c

sr.pem -out client.cer  -days 365
Above command will create a client.cer file
Note that CA has kept the ClientCertificate_csr.pem inside certs folder in X509CA directory

Convert to PEM format
Use the following command to convert the client.cer  so generated to PEM only format

openssl x509 -in client.cer -out CertName.pem -outform PEM


 Above command will generate a csr file named as ClientCertificate_csr.pem

Content of ClientCertificate_csr.pem 

-----BEGIN NEW CERTIFICATE REQUEST-----
MIICXzCCAh0CAQAwWjELMAkGA1UEBhMCSU4xFDASBgNVBAgTC01haGFyYXNodHJhMQ0wCwYDVQQK
EwRTU1BMMRAwDgYDVQQLEwdTU1BMIE9VMRQwEgYDVQQDEwtleGFtcGxlLmNvbTCCAbgwggEsBgcq
hkjOOAQBMIIBHwKBgQD9f1OBHXUSKVLfSpwu7OTn9hG3UjzvRADDHj+AtlEmaUVdQCJR+1k9jVj6
v8X1ujD2y5tVbNeBO4AdNG/yZmC3a5lQpaSfn+gEexAiwk+7qdf+t8Yb+DtX58aophUPBPuD9tPF
HsMCNVQTWhaRMvZ1864rYdcq7/IiAxmd0UgBxwIVAJdgUI8VIwvMspK5gqLrhAvwWBz1AoGBAPfh
oIXWmz3ey7yrXDa4V7l5lK+7+jrqgvlXTAs9B4JnUVlXjrrUWU/mcQcQgYC0SRZxI+hMKBYTt88J
MozIpuE8FnqLVHyNKOCjrh4rs6Z1kW6jfwv6ITVi8ftiegEkO8yk8b6oUZCJqIPf4VrlnwaSi2Ze
gHtVJWQBTDv+z0kqA4GFAAKBgQC7lgoimVAL4UcigXU0moV+F21y5hFy1IxpbFXneOVBTNtTVEBK
/HHnXqqOZY/zt4pZAzxREznd6N8OQ/jMiQloCqdBbkBJB/wFBBQWu2LNje1w9xeBCXxTHZCDHPIS
MmSvXBle8Ea8Dx4XHc/YElj2Mh+nJJrjbD3z7LD75Rky3KAAMAsGByqGSM44BAMFAAMvADAsAhRB
e3g6WqpdjFl7n9W92kXDEUe4IgIUWDagaMduPq+qx2/jsfjfFdrgxXU=
-----END NEW CERTIFICATE REQUEST-----

Generate a signed certificate for the associated Certificate Signing Request.

CA uses the following command to sign the CSR file

openssl ca   -config openssl.cnf -in certs/ClientCertificate_c
sr.pem -out client.cer  -days 365
Now the CA has signed the CSR and will give the signed file to the client